TO ALL OUR READERS AND SUPPORTERS!!!
2024-02-06
 Hello there!
It’s been a long time, some two years actually, from our last publication. Truth is, we’ve been busy with some other
projects which are not directly related to the FMT. Anyway the page is active and plans supplied on demand. Those
other projects may eventually be included in this webpage. But, as you can imagine, it takes time to develop
something to DI...
[read more...]
Improved Blade Guard for the FMT Table Saw
2022-02-04
 This new version of the Blade Guard was developed with three features in mind: A narrower cross section with no obstructions protruding from its right side, better visibility of the workpiece passing under it and lighter weight. I’ve been testing it for quite some time and am quite pleased with the results. The improvements were achieved and are indeed worthwhile. A first view of the Improv...
[read more...]
A larger Muffler for the Dust Collector
2020-12-06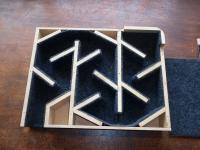 With modern blades being very silent, most of the noise from the FMT Table Saw comes from the Shop Vac motor used to power the Dust Collecting System. Our latest improvement is a new, larger Muffler which cuts down noise drastically.
This was my first attempt to fit a noise deadening system. Sadly, only partially effective.
The new design is three times larger and its performance is ...
[read more...]
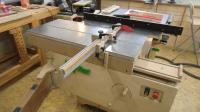
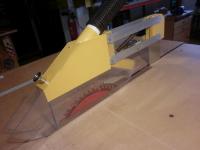
A compact Miter Fence for the FMT Table Saw
2020-08-27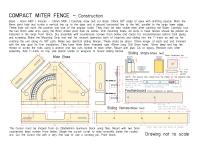 Small home shops are continually struggling against their available space. This Compact Miter Fence offers an alternative to the much longer standard Crosscut Fence with some additional interesting and useful applications.
[read more...]
Crosscutting with the FMT Table Saw
2020-08-11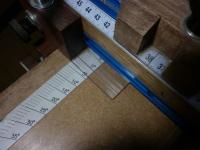 Following the Article on Ripping, we deal here with the other common task in a tablesaw: Crosscutting. We have also included angled and miter cuts which, although not so frequent, undoubtedly fall into this category.
[read more...]
A real case of using Fritz & Franz jig
2020-07-28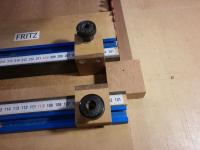 An example of how useful this jig is for specially "difficult or nearly impossible" tasks. Besides, it shows how safe the whole operation results with fingers well away from the spinning blade.
[read more...]
Ripping with the FMT Table Saw
2020-07-22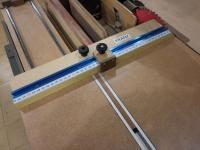 This is an Article describing how different operations are to be carried out in a Sliding Table Saw such as the FMT. As an introduction, we have already published one on the philosophy behind the design and another on working safely. We plan to continue the series with additional suggestions on other types of current tasks. The idea is to share both our own and third party knowledge in quest for c...
[read more...]
Multi-use Stand
2020-07-14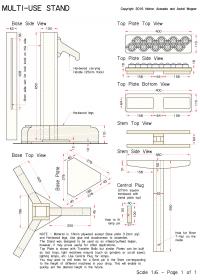 This shop Stand looks like many others already published elsewhere. However, most are designed for a single purpose, namely as an outfeed support for the table saw. This one will indeed work for that purpose but its head is conceived to function as an open base that can receive different tops or shop items. Such versatility will be appreciated as, instead of occupying space and being used occasion...
[read more...]
Multi-use_Stand.pdf
Regulator Wall Clock
2020-06-17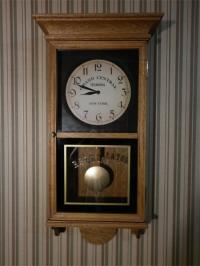 This project started with a cheap quartz clock which I found in a local supermarket. Its sphere attracted me on account that it looked like a Train Station replica. It worked pretty well with just a single A battery, so the fake copper ring used as a mounting and the round glass were promptly discarded. I just kept the sphere, the hands and the mechanism.
I had an old Woodsmith issue (Nov/D...
[read more...]
Working safely with the FMT Table Saw
2020-06-08 Here are some rules and techniques to keep in mind when working with our design and with other sliding table European style machines as well.
[read more...]
The philosophy behind our design
2020-06-01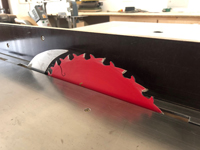 The design of our table saw is based on the general characteristics of professional european table saws including their exceptional safety properties. They are designed to be used with the operator standing at the left side of the machine. So much so that most controls are grouped there. Only in exceptional circumstances the operator will stand in front of the blade. Dado blades are not allowed in...
[read more...]
Miguel Genova's Table Saw - Part 2
2019-10-13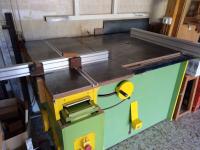 This the second and final part of Miguel Genova’s build. His saw is now completed and nicely finished.
[read more...]
Miguel Genova's Table Saw - Part 1
2019-10-01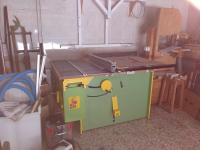 Miguel lives in Spain and has a small shop in his garage. Using his old commercial table saw he was able to slowly build a Format Table Saw. There are some details he plans to add shortly, but so far the new machine became already operational.
[read more...]
Joost's Format Table Saw - Part 1
2019-08-19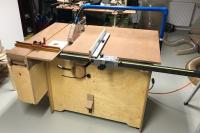 Dr. Joost Garen started his build by outsourcing the construction of the main Arbor. He was fortunate to find a top notch lathe turner which followed the specifications closely and did an excellent job.
[read more...]
Plans Update
2019-06-30 We are pleased to announce the availability of V3.1 of the Format Saw plans both in English and Spanish. The Sliding Table Attachment also has a new version 1.1. The changes are small but important. We are now suggesting a new size of ball bearing for the Retaining Wheels of the Sliding Table and changed the mounts to 3/4" instead of 1" aluminum bar stock. These two modifications enable better ope...
[read more...]
Actualización
2019-06-30 Nos complace anunciar la disponibilidad de la versión V3.1 de los planos de la Sierra estilo Format tanto en Español como en Inglés. El Sliding Table Attachment cuenta también con una nueva versión 1.1. Los cambios son pocos pero importantes. Estamos aconsejando un tamaño distinto de rulemanes para las Ruedas de Retención de la Mesa Deslizante y se cambió la barra hexagonal...
[read more...]
Sliding Table - Angular Scale
2018-06-17 The Angular Scale for crosscutting on my Sliding Table was not yet properly built and attached. I had once a temporary scale stuck with transparent tape on top of the metal table cover. It got damaged very easily rendering it useless. The solution is mounting the scale on a strip of MDF or Hardboard recessed in a cutout in the metal cover. So I removed the metal plate and proceeded to mark and mak...
[read more...]
Luc's Format Table Saw - Part 2
2018-06-07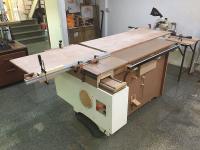 The second and final part of Luc's building process.
[read more...]
Dust Collector Exhaust Muffler
2018-06-05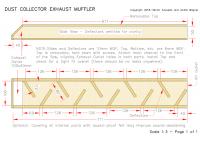 With the Dust Collector venting to the outside it was found that the noise level increased severalfold and a jet of cooling air would hit the operator and blow dust or debris laying in the shop. Therefore we set down to design a muffler that would deal with these two issues.
There were a few test arrangements before we settled for the present one. Some of the photos correspond to initial ap...
[read more...]
Sliding Table Attachment Plans online
2018-05-03 Due to the great interest shown in this useful addition, we prepared a special set of plans, instructions and photos which you can find using this LINK
[read more...]
¡AHORA TAMBIÉN EN ESPAÑOL!
2018-04-22 Nos complacemos en anunciar el lanzamiento de la Versión 3 de los Planos, Manual y Archivo de Fotos para construir nuestro diseño de una Sierra Estilo Format.
Esta versión mejorada reduce a un mÃnimo la construcción de piezas metálicas a torno e incorpora varias mejoras destinadas a aumentar su eficiencia asà como simplificar la construcción, armado y ...
[read more...]
Format Table Saw Plans V3
2018-04-22 We are pleased to announce the release of Version 3 of the Plans, Manual and Photos File for building our design of a Format Style Table Saw.
This improved version strives to reduce lathe work to an absolute minimum and incorporates several changes that should enhance efficiency as well as making quite a few things easier to build, assemble and operate. We were fortunate to r...
[read more...]
Steven Zhang's Sliding Table Attachment
2018-04-01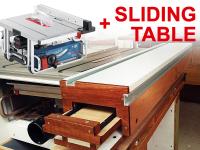 We recently came across an extremely interesting usage of the Sliding Table designed for our Format Table Saw. We actually had considered such attachment as a future project but had postponed it to a future date.
Steven Zhang is a Chinese woodworker now living in Australia and has built a very neat Sliding Table for his Bosch Benchtop Saw Model GTS-10. To showcase his work he also produced ...
[read more...]
Router Lift
2018-02-19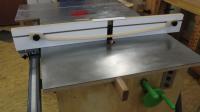 Adding a Router at the right-hand side of a Table Saw is common practice. Therefore, we set down to evaluate a possible installation and provide an example of one of the many Router Lift plans available. We chose the one designed by John Heisz (plans available at ibuildit.ca) as it appears to be more adaptable to routers that have odd shaped bodies. The installation shown in the following article ...
[read more...]
Pedro's Format Table Saw - Part 3
2018-01-29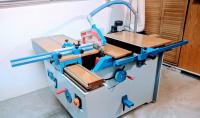 Pedro's Saw now appears to be complete. He claims no space for an Outrigger Table, but one never knows...
[read more...]
Pedro's Format Table Saw - Part 2
2018-01-15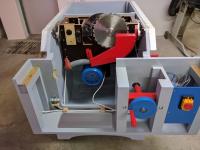 Pedro's Project is going on. Here are some more pics.
[read more...]
Luc's Format Table Saw - Part 1
2017-12-02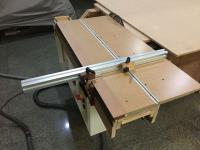 Our friend Luc Scholte van Mast, Dutch by birth but living in Thailand, became a firm believer in our project from the very start. Luc has been weekly reporting his progress of his work in the Ibuildit Forum.
 This first picture shows the massive arbor and pillow blocks. He opted for a 32mm diameter shaft on 30mm pillow blocks, turned down to 25.4mm at both ends. Saw blades where he...
[read more...]
Pedro's Format Table Saw - Part 1
2017-11-17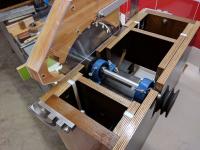 We have received a set of photos from Pedro Morey Ribot showing his splendid work. Pedro is from Spain and lives in the island of Mallorca on the Mediterranean Sea.
[read more...]
Router Lift
2017-10-18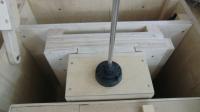 These days we are working on a solution for a router lift which is included in the right side of the cabinet of our saw.
[read more...]
stained wooden Ethiopian flag
2017-09-04 This is a short video about making a stained wooden Ethiopian flag.
[read more...]
Fritz and Franz jig - Part 4
2017-08-07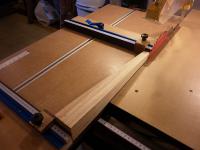 The Fritz and Franz jig can be used to cut tapers. They can be one, two, three or four sided.
Here you see a four sided taper. To cut the first side set the workpiece as illustrated. Note that the end (foot) of the taper is facing into the blade. It is recommended to mark with pencil lines the end (foot) with the final profile. Also mark on the sides where the taper should end.
[read more...]
Workbench - Part 5: Barrel Nuts
2017-07-22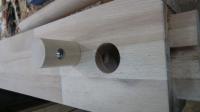 I was not able to get bed bolts of the required size so I devised a method to fabricate barrel nuts using T-nuts inserted in a hardwood dowel.
 This is the part we want to build. A small one but providing an important function.
Begin by cutting two identical supports to hold the dowel securely in place on the drill press table. Cut two 45° angles to create a V-gro...
[read more...]
Workbench - Part 4: Wood work
2017-07-15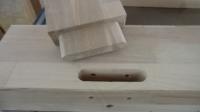 The whole bench was built using plans from Guido Henn. Search online for Roubo Workbench plans. The plans supply all necessary dimensions. Some dimensions were slightly altered to fit the available material.
 Start by buying some beech hardwood planks. I used those made for kitchen tops. The thicker ones are 38mm thick and the thinner ones are 27mm. I used a combination of both to o...
[read more...]
Workbench - Part 3: Hand wheels
2017-07-08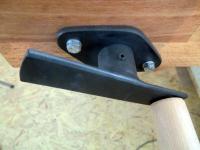 This installment will cover the manufacture and installation of the operating handles for the vises. These are attached to the Acme threaded rod with a grub screw. It is also possible to use a cotter pin all the way through the rod. This would avoid tapping a thread.
 The Acme threaded rod is sized down at the handle end. Leftover traces of the threads can still be seen on the photo...
[read more...]
Workbench - Part 2: Metal work
2017-06-30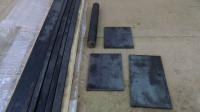 This installment deals with the wagon vise components. The photo shows how the parts are assembled to create the sliding rails. All bars and the sliding plate have the same thickness.
 To build a rail mark and drill holes in one of the outer bars. Clamp this bar to the other bars and drill the holes through the remaining two. This way they all line up perfectly. I welded the bars to...
[read more...]
Workbench - Part 1: Metal work
2017-06-22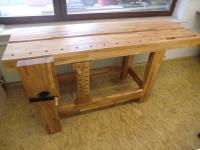 This is the first installment of a series on how I built my workbench. This first article is about metal work. You will find that it is a lot easier than you might think.
 Here is all the required material. A round steel rod 30mm in diameter. Three metal plates and some flat strips plus 1m of ACME threaded rod (about 18mm in diameter) with two nuts.
To start working ...
[read more...]
Router jigs
2017-06-14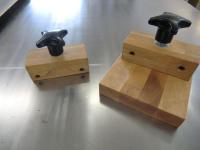 Building the new workbench required a lot of work with the router. I missed a good fence, easy to build and quick to set. And an extra support to prevent the router from tipping over when placed on a narrow surface.
 The fence is easily attached to the router base using two 8mm round steel guide bars.
To set the fence at the right distance you only have to loosen a k...
[read more...]
New Workbench
2017-05-20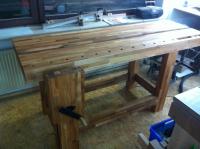 Coming up next...
[read more...]
Fritz and Franz jig - Part 3
2017-04-30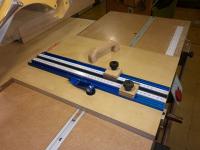 To further enhance the usability of the Fritz and Franz jig I added T-Tracks and a pair of simple adjustable stops. The tracks stop 2mm short at the edge against the blade.
Had some surplus right-to-left self adhesive metric tape which I stuck in place along the tracks. The reading in one of the tapes starts at 2m and the other at 3m (I was not going to purchase new ones so that bot...
[read more...]
Fritz and Franz jig - Part 2
2017-04-19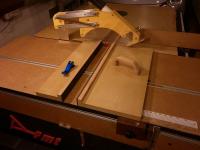 This second installment explains how to use the jig without the Outrigger Table and Fence.
 The simplest solution is to attach a temporary fence at the end of the Sliding Table. I made mine from some scrap 12mm plywood, 50mm high and 430mm long. This fence can be held in place with woodscrews. Since I had some surplus 1/4" inserts I used them instead. I drilled large enough holes an...
[read more...]
Fritz and Franz jig - Part 1
2017-04-13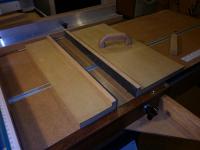 This simple jig with a funny name is a clever and useful aid capable of dealing with difficult tasks with great safety. It is a holding device set on the Sliding Table that is like an extra pair of hands to keep your own well clear of the running blade.
 Rather than describing its many features and capabiites we suggest that you have a look at: www.youtube.com/watch?v=DqzVglze9Nk. T...
[read more...]
The right Belt
2017-04-10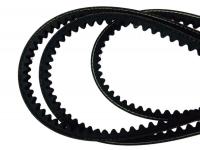 What is the right Belt for the saw? We have had some experience with different kind of V-belts. There are three main categories to choose from: regular v-belts, cogged belts and link belts .
 The photo at the left shows a typical link belt.
Link belts provide some stretching that makes them ideally suited for our designed mechanism. The distance between pulleys varies by a few millim...
[read more...]
Taper-Lock pulleys
2017-04-02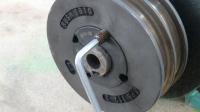 Here are the components of a typical Taper-Lock Pulley. Its center bush is split to allow it to be compressed onto the shaft. Opposite this split there is a tapped half-hole and two plain half-holes at each side of the split.
 Taper-Lock Inserts are available for different shaft diameters. They already include a slot for a keyway. The shaft on our Tablesaw needs no keyway, a Taper Lock syst...
[read more...]
Commercial Clamps
2017-03-23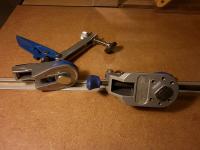 If you are inclined to spend a little bit more, Rockler has produced two types of clamps of excellent quality.
 Here you see the Auto-Lock T-Track Clamp being used to clamp a workpiece against the crosscut fence on the sliding table.
Both types are adjustable for pressure and they apply what you set up no matter the thickness of the workpiece. The one you see here has an adjustable ...
[read more...]
Simple Hold-down
2017-03-14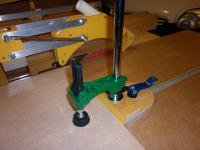 This simple hold-down is built around a drill press hold-down supplied by http://www.justclamps.com/driipress_clamp.htm. You may find it also in Amazon, Woodcraft, etc.
The original has a ring nut to attach it to the drill press table. You may discard it and screw the post directly into a slightly smaller hole in a plywood base. The post has two flats for a wrench and will cut its own threa...
[read more...]
A shop-made stay for the lift-up table
2017-02-28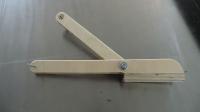 This is a convenient addition to keep the lift-up table open while accessing the contents of the right hand space of the saw. The construction is self evident from the attached photos. Material is 12 or 15mm thick plywood plus a block of hardwood for anchoring the system to the underside of the table. A few woodscrews, bolts, nuts and washers are also required. The resulting product is strong and ...
[read more...]
Welcome to Thinkbold Site
2017-01-28We coined its name to convey the idea that many things become possible if one dares to think that way. In fact, t...
[read more...]